
Theodore Levitt's old line about drill bits applies to ductless: nobody wants a quarter-inch bit. They want a quarter-inch hole. Nobody wants a mini-split either. They want the bedroom over the garage to be usable in July. The contractor who can design, price, and close that fix while sitting at the kitchen table wins the job. The one who has to come back with a proposal often does not. Sales Builder Pro is the only HVAC sales tool with built-in ductless design tools, and this post explains what that means for the consultant, the install crew, and the business.
Why do comfort consultants avoid ductless?
Because replacement sales pay the bills. When a furnace quits in January, the homeowner will buy something from someone this week. The need is urgent, the visit is fast, and there is not much follow-up. Consultants are built for that call.
Ductless is the opposite. The homeowner is solving a comfort problem, not an emergency. There is a lot of thinking, a lot of technical questions, and no deadline. The deal takes longer, and it requires more follow-up. In most markets, ductless is still roughly 10 to 15 percent of residential sales, so a consultant can make a living without ever getting good at it.
A company cannot. Ductless share is growing in most markets, the tickets are large, and the installs are often twice as fast as a replacement because there is nothing to tear out. The contractor who takes a bigger share of ductless each year grows faster than the competitors around them. That is the gold mine, and the consultants' reluctance is the only thing standing in the way. The job of the Ductless Design Tools is to make a ductless job as easy to sell as a replacement unit.
Why does a ductless quote take two visits almost everywhere?
Because the design step happens somewhere other than the kitchen table. The consultant measures the rooms, takes photos, and either drives back to the office to run the manufacturer's design software or calls the distributor or the OEM rep for layout advice, which means telephone tag. Then the output gets converted into a proposal, and a return visit gets scheduled. Each step costs a day, and the homeowner has that time to cool off, get a second quote, or decide the room is fine after all.
Put the two paths side by side, and the difference is dramatic. No second call:
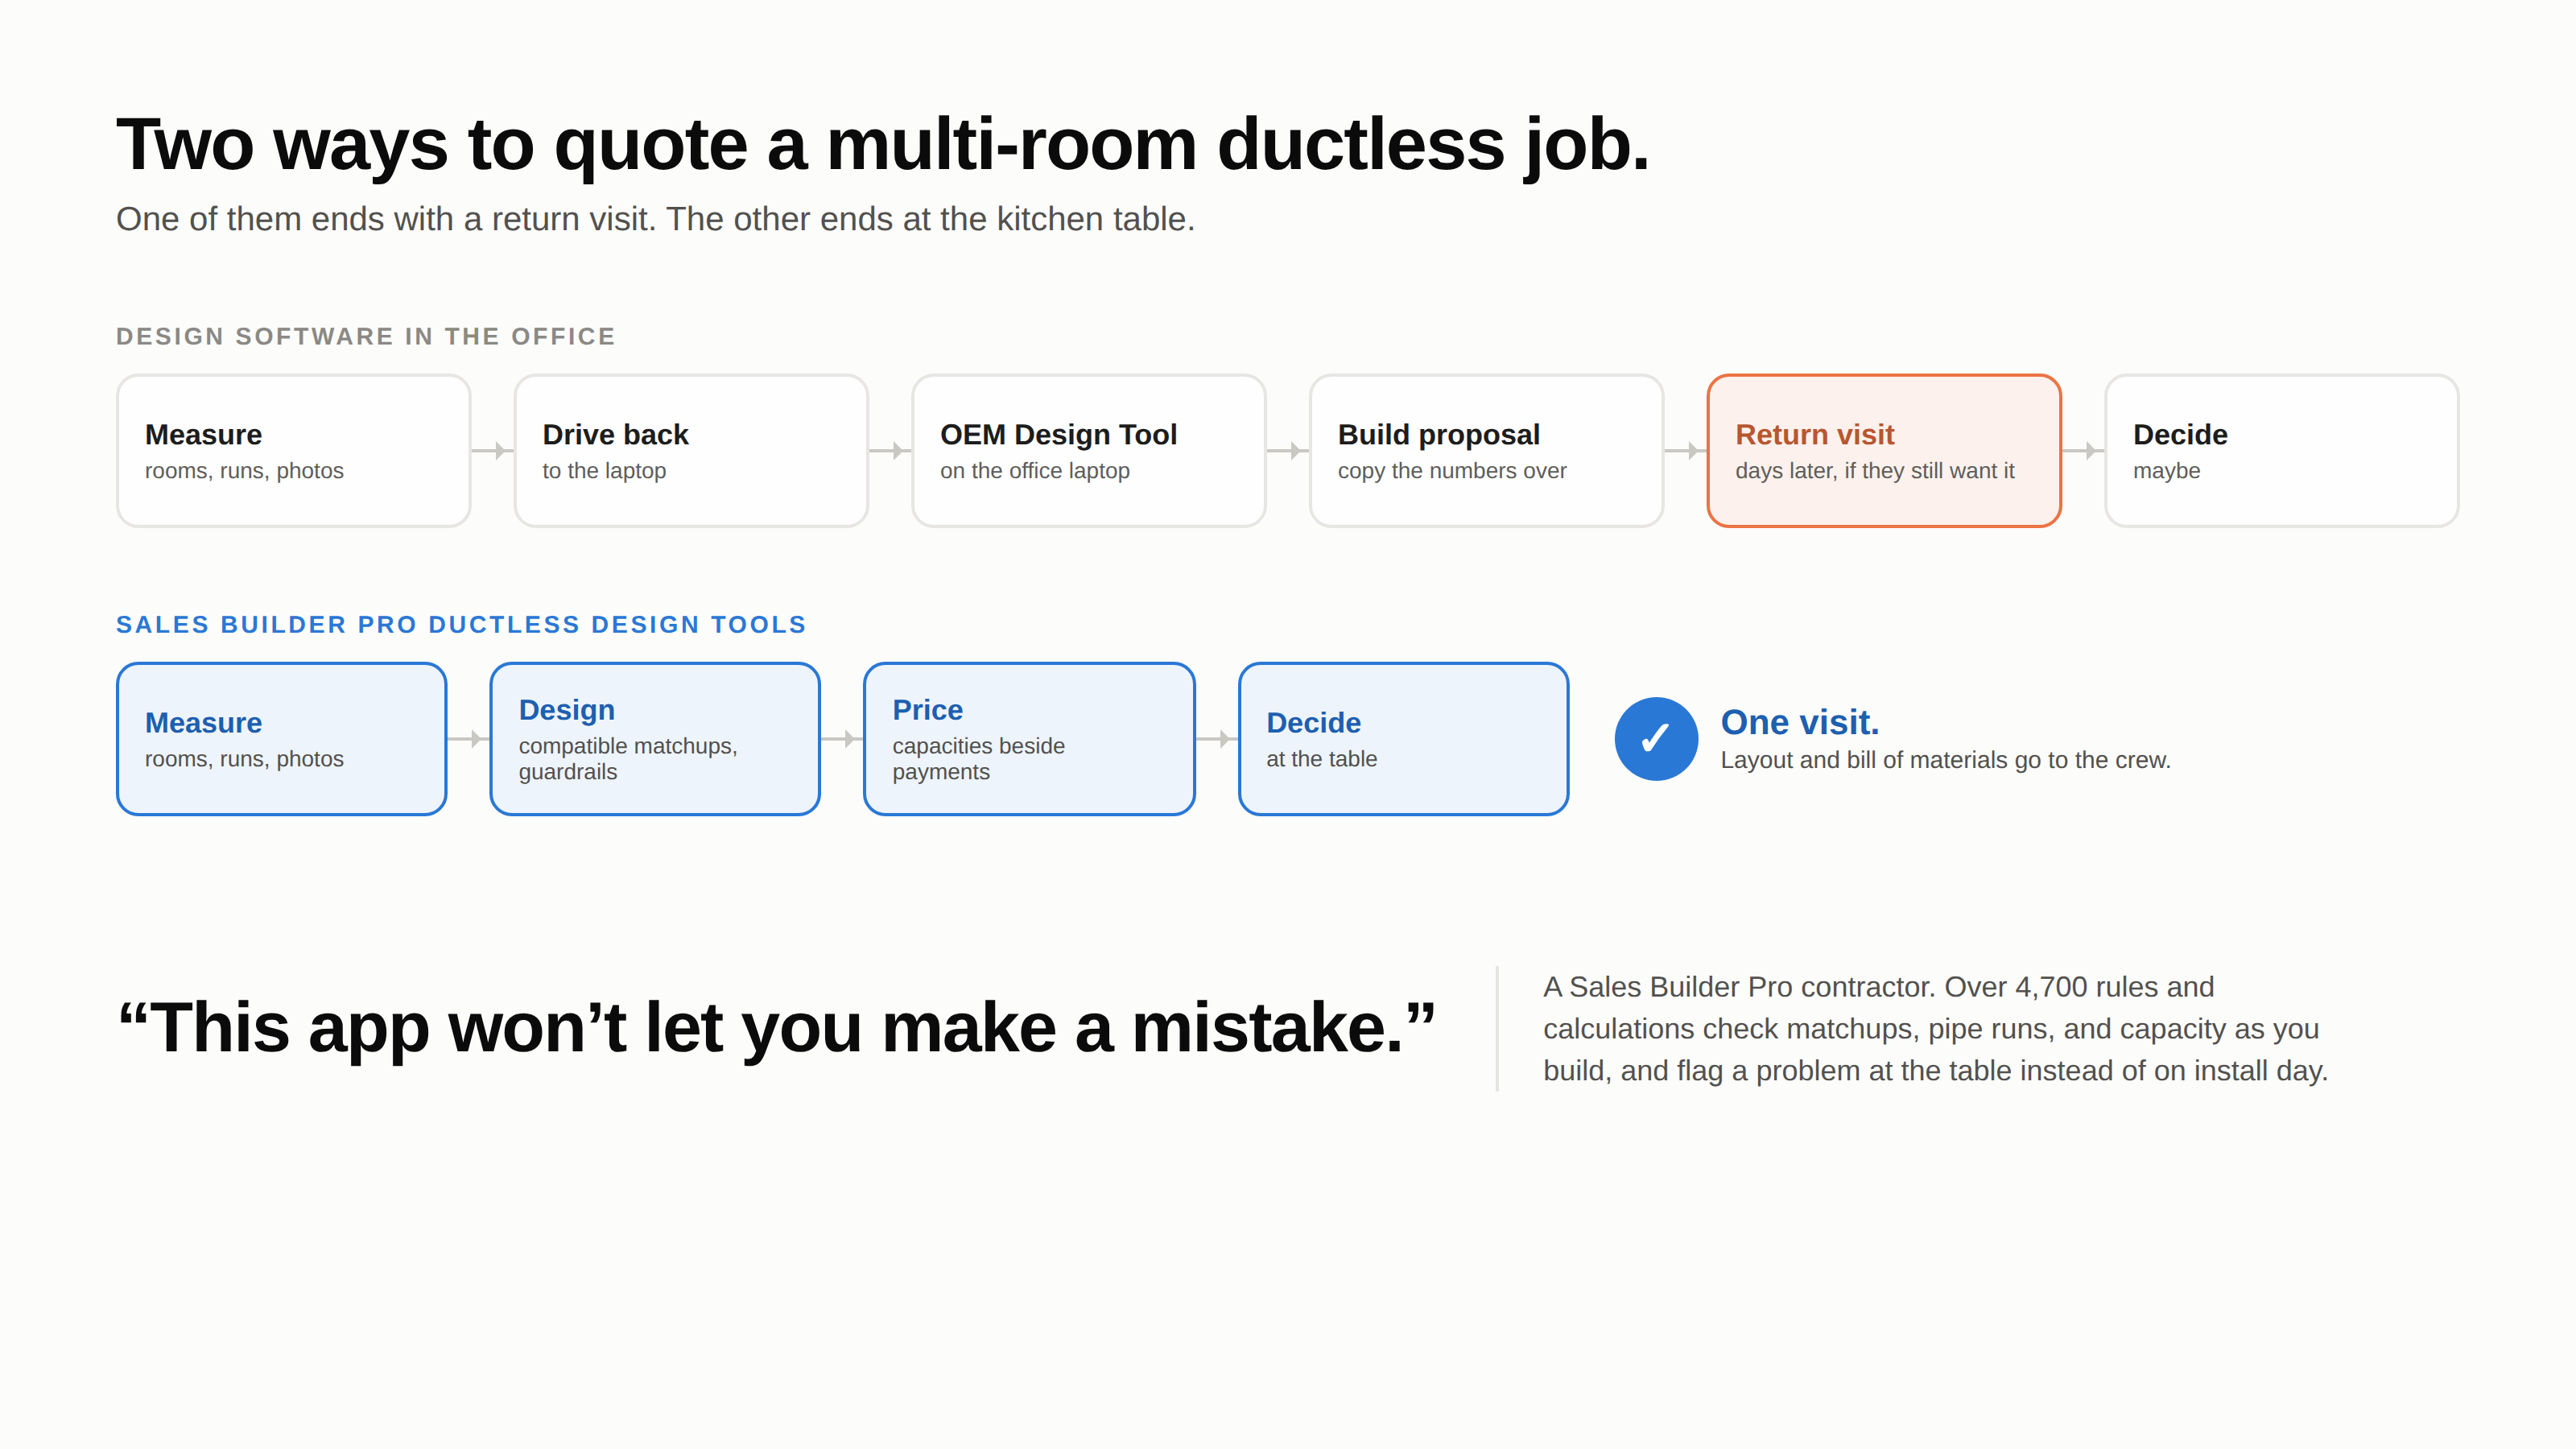
None of this is a knock on the manufacturers' design tools. They are the right tools for checking a complex design; the carpenter measures twice and cuts once. But they were built for engineers at desks, not consultants at tables: they are slow, they need a laptop, and if you carry two ductless brands, you need to learn and master two of them. The return visit becomes the hidden cost of ductless, and it is why some consultants quietly steer homeowners toward the ducted option they can price on the spot.
What do the Ductless Design Tools actually do?
They put a design step the consultant can run into the sales call itself. You enter your local design criteria once: indoor and outdoor design temperatures and altitude. From then on, for supported brands, the app offers only compatible indoor and outdoor matchups, puts guardrails on pipe runs, and corrects capacity for temperature, line length, defrost, and combined load. It recommends the required and optional install materials: line sets matched to port size, adapters, extra refrigerant, and compatible accessories. Over 4,700 rules and calculations run in the background, the same way for every supported brand. As one contractor put it, "This app won't let you make a mistake."
Two things Ductless Design Tools do not do. They do not replace good judgment on equipment selection. And they do not design for you; the consultant still gathers the room information, the run lengths, and the photos that verify the design for both the customer and the install crew. Ductless Design Tools closes the gap between gathering that information and pricing a proposal.
What does a multi-room design look like at the table?
A few quick steps plus one optional review, in the order a consultant uses them.
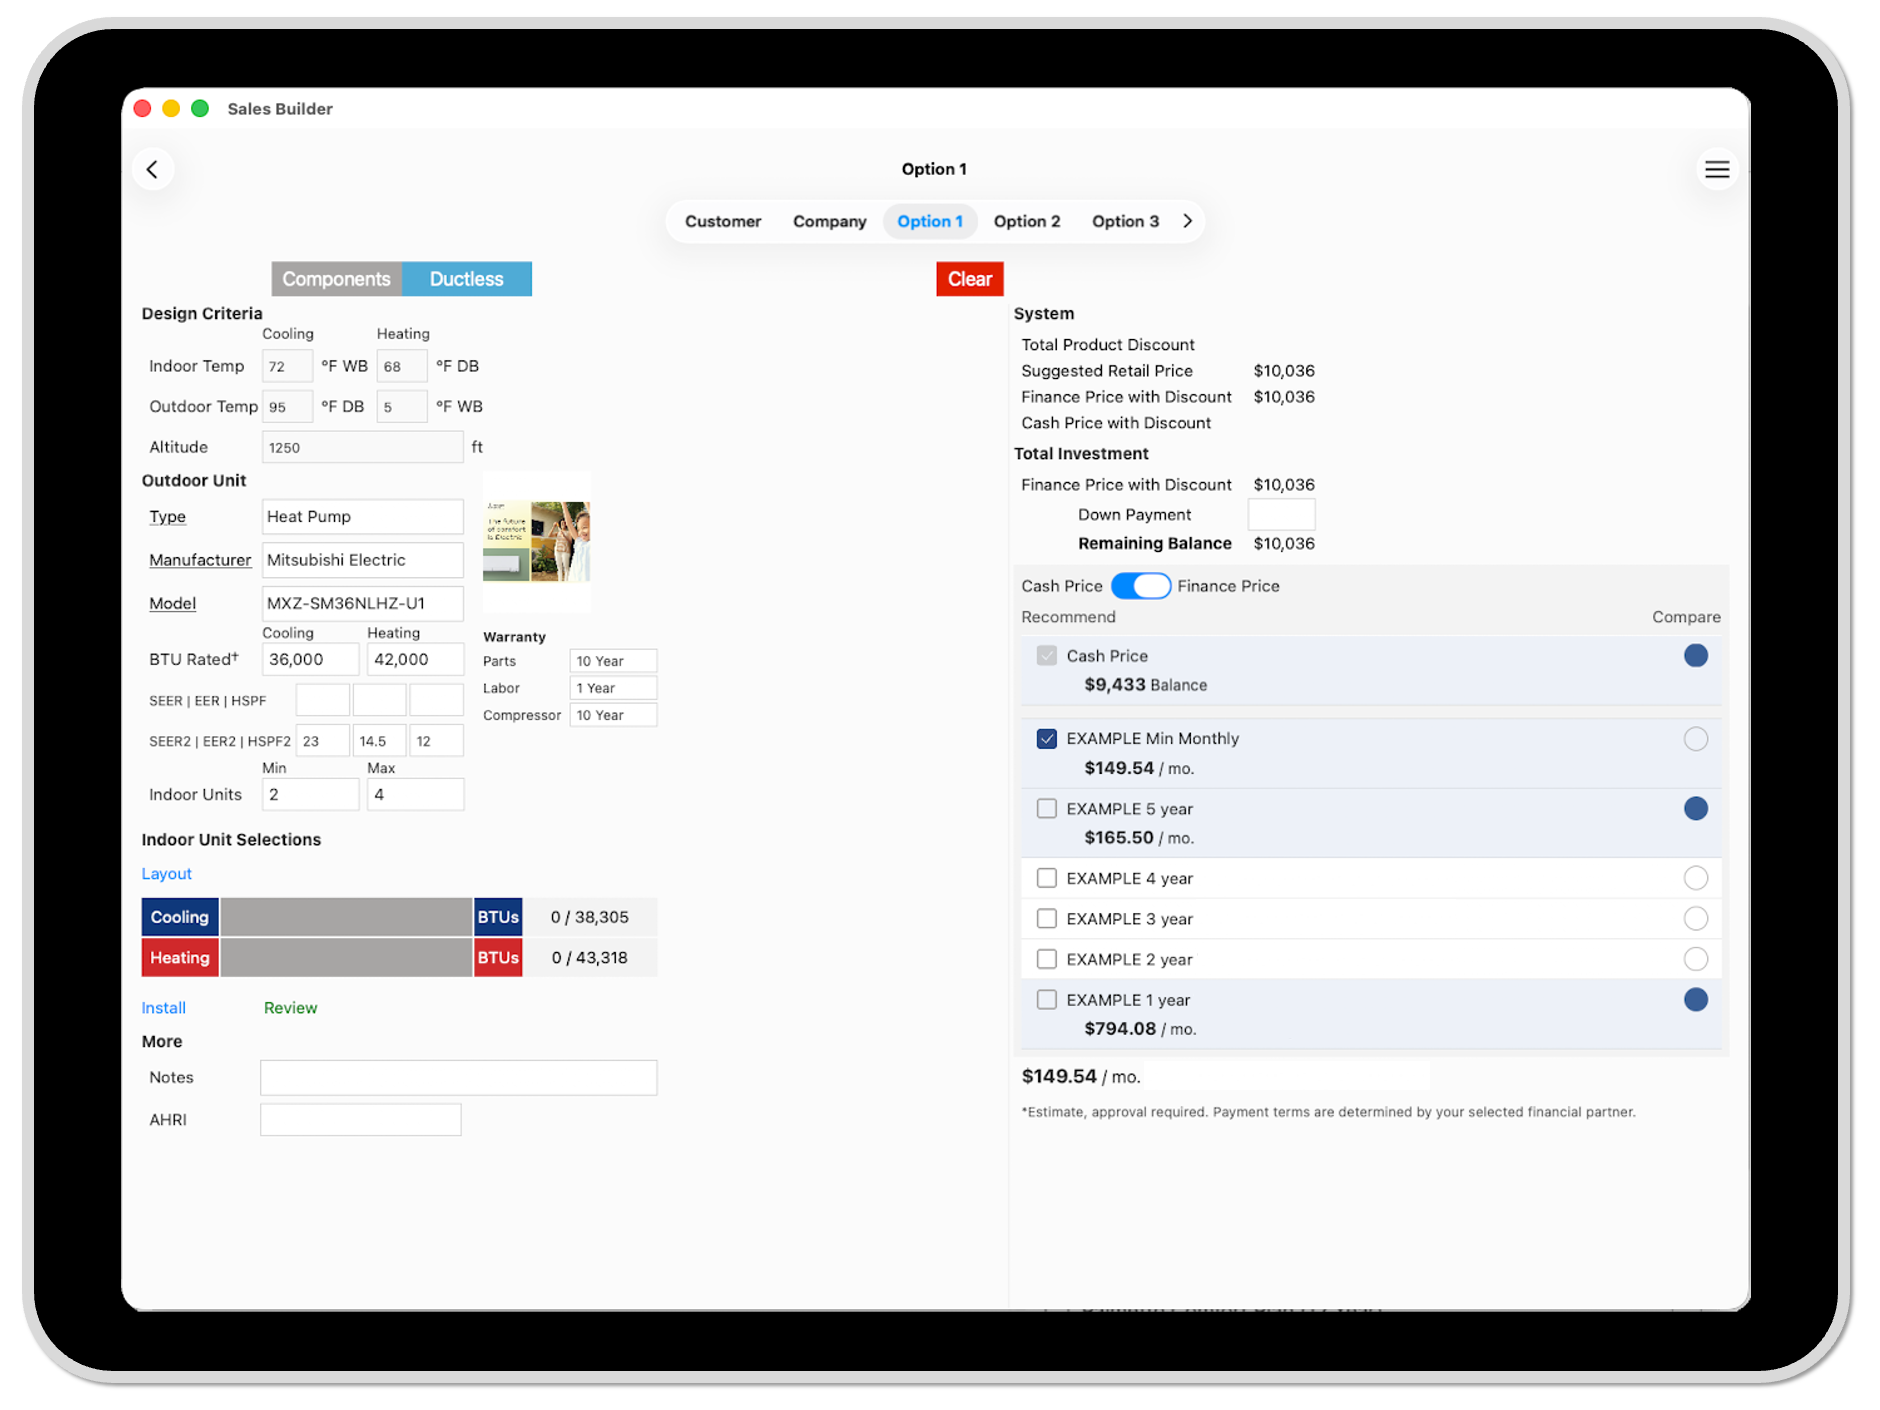
Step 1 of 6
Select Outdoor Unit (ODU)
Ductless Design Tools open with pre-set Design Criteria to allow for temperature and altitude corrections. This is set-it-once-and-forget-it for most contractors, but you can change it at the point of sale. Then the consultant selects a Type (e.g., Heat Pump), Manufacturer, and Model. Rated capacity and efficiency values, warranty info, a thumbnail brochure (that opens to the brochure), price, and monthly payments are all automatically displayed.
Step 2 of 6
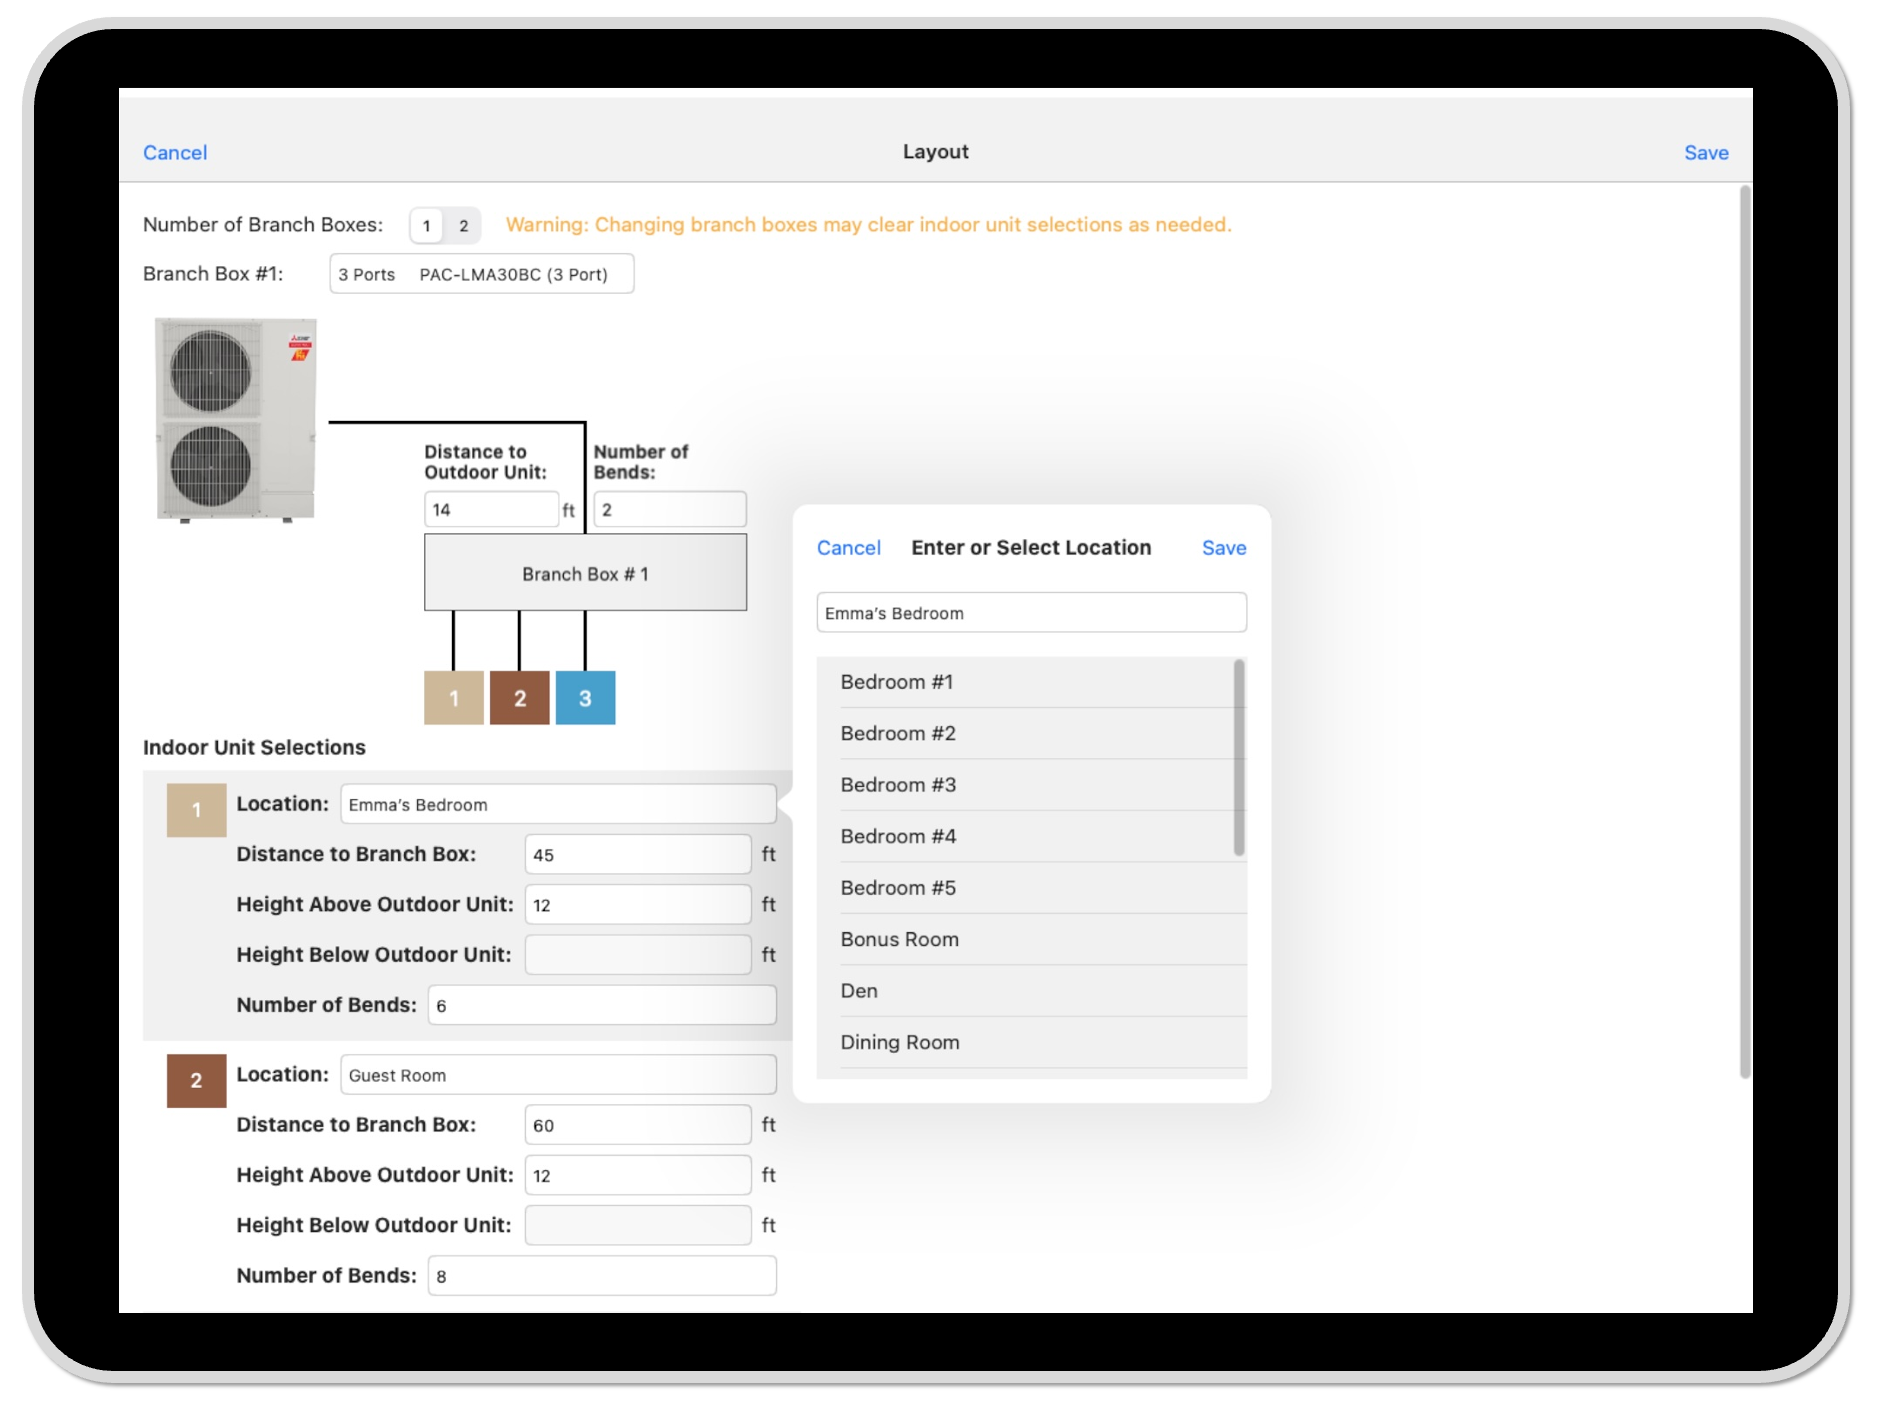
The Layout Manager
Enter each run: distance, elevation, and bends. The app applies the multi-zone, branch-box, piping, and equivalent-length rules for the selected equipment as you go. Room names carry through to the proposal and the install record, so "Bonus Room" means the same thing to the crew that it meant to the homeowner.
Step 3 of 6
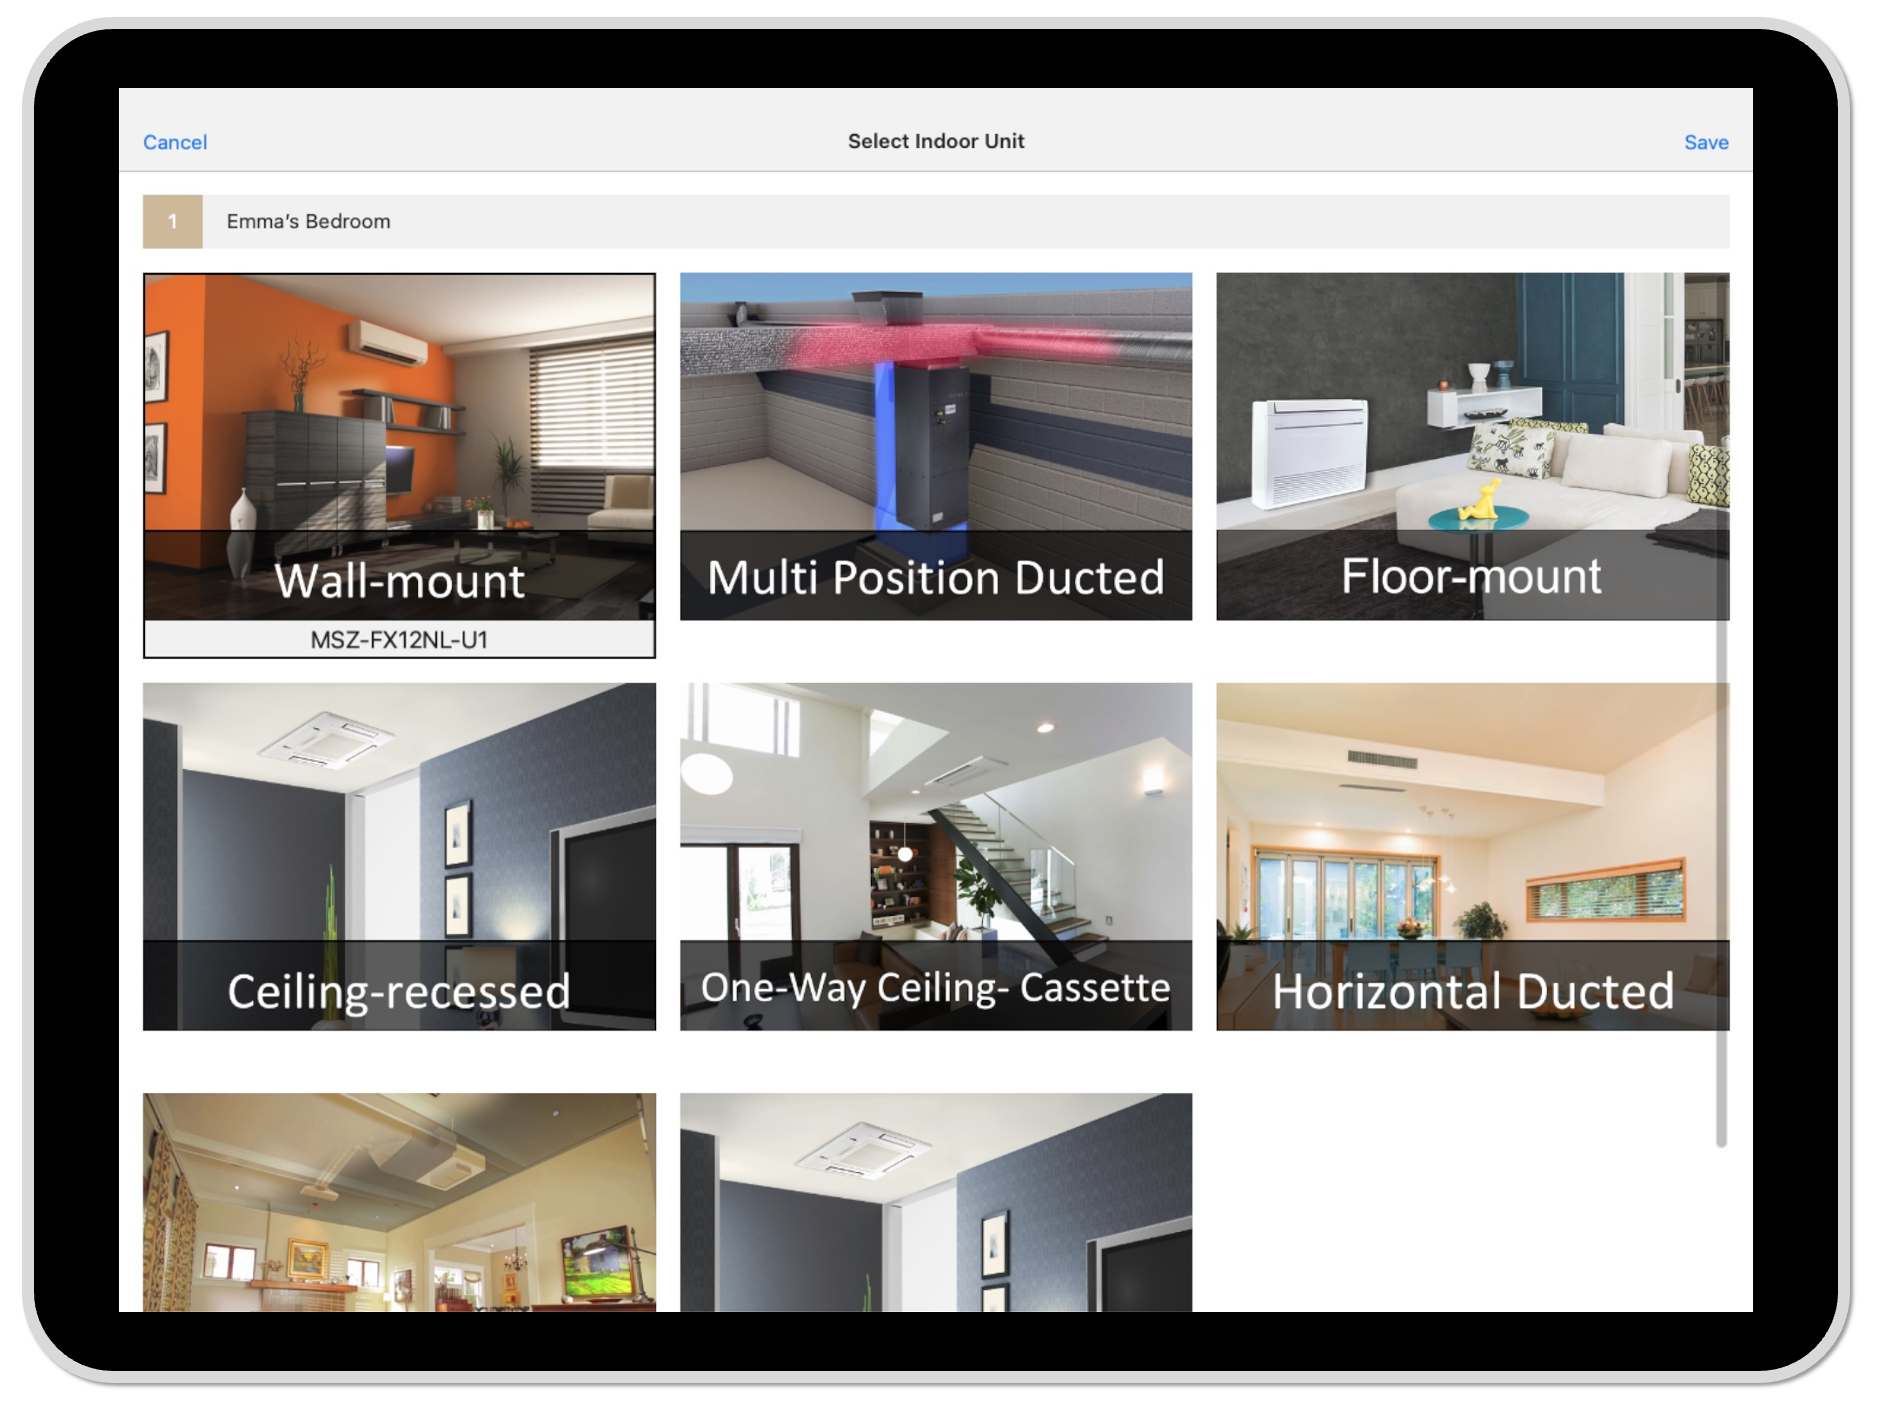
The Visual Selection Tool
Homeowners cannot picture a one-way cassette or a floor-mounted unit. This screen shows each mounting style in a real room, filtered to the indoor units compatible with the outdoor unit you selected. The family compares pictures; the app has already checked the match.
Step 4 of 6
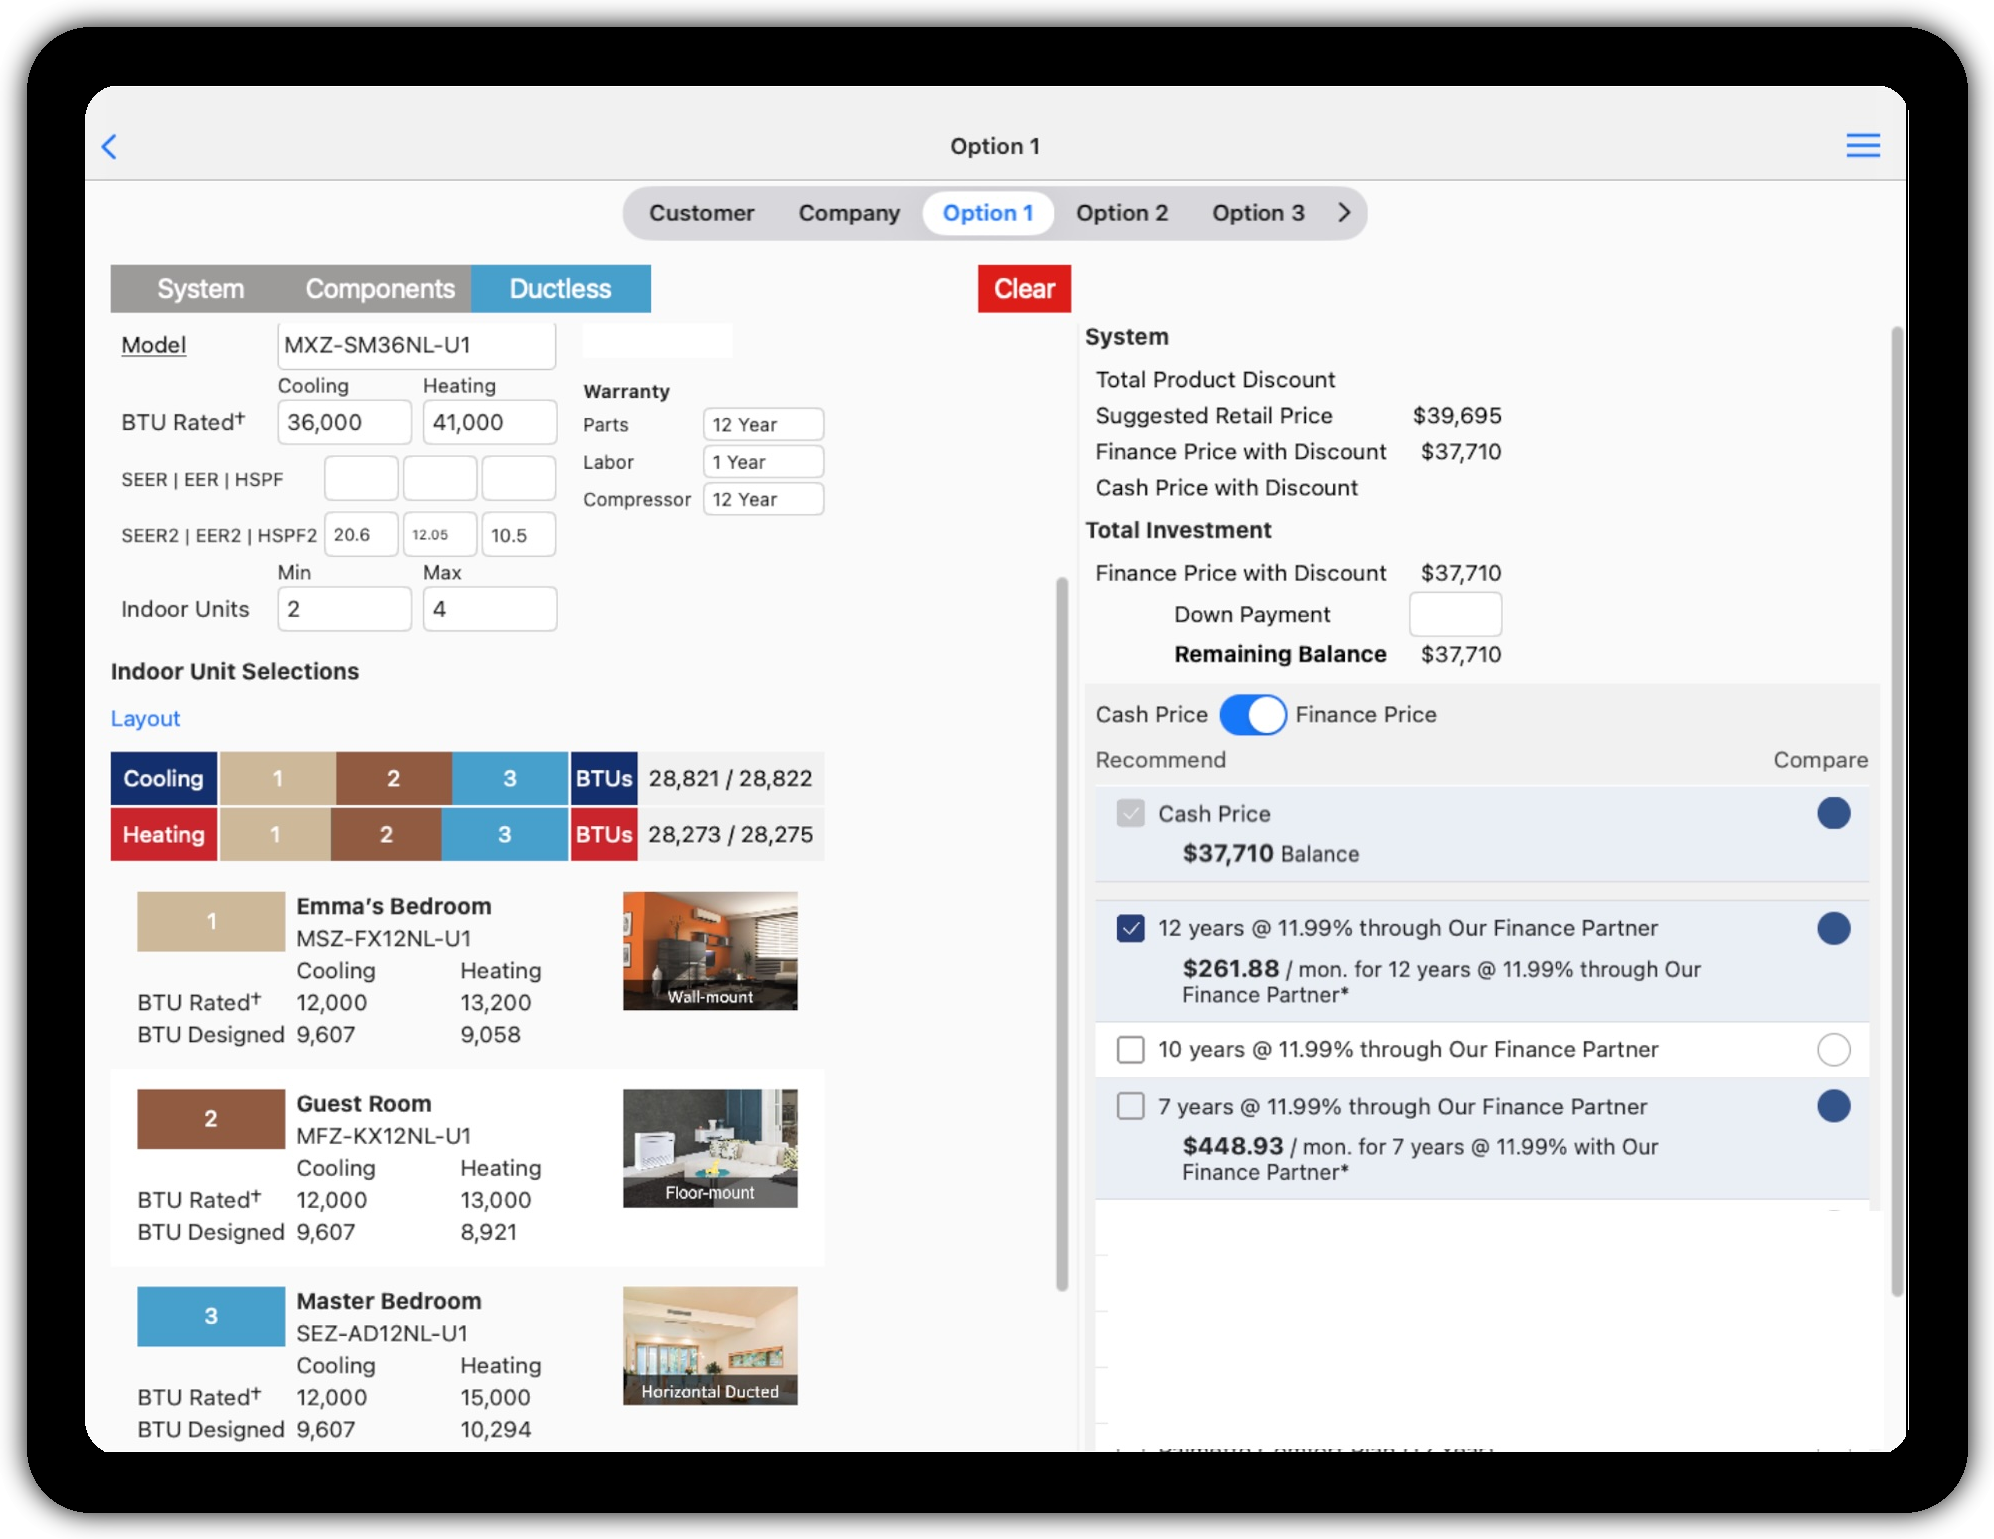
The Option screen
Rated and designed capacities for each zone, adjusted for your design conditions, altitude, and piping, sit beside the total investment and the monthly payment options. The calculations run on the tablet without an internet connection, so a basement with no signal is not a problem.
Step 5 of 6
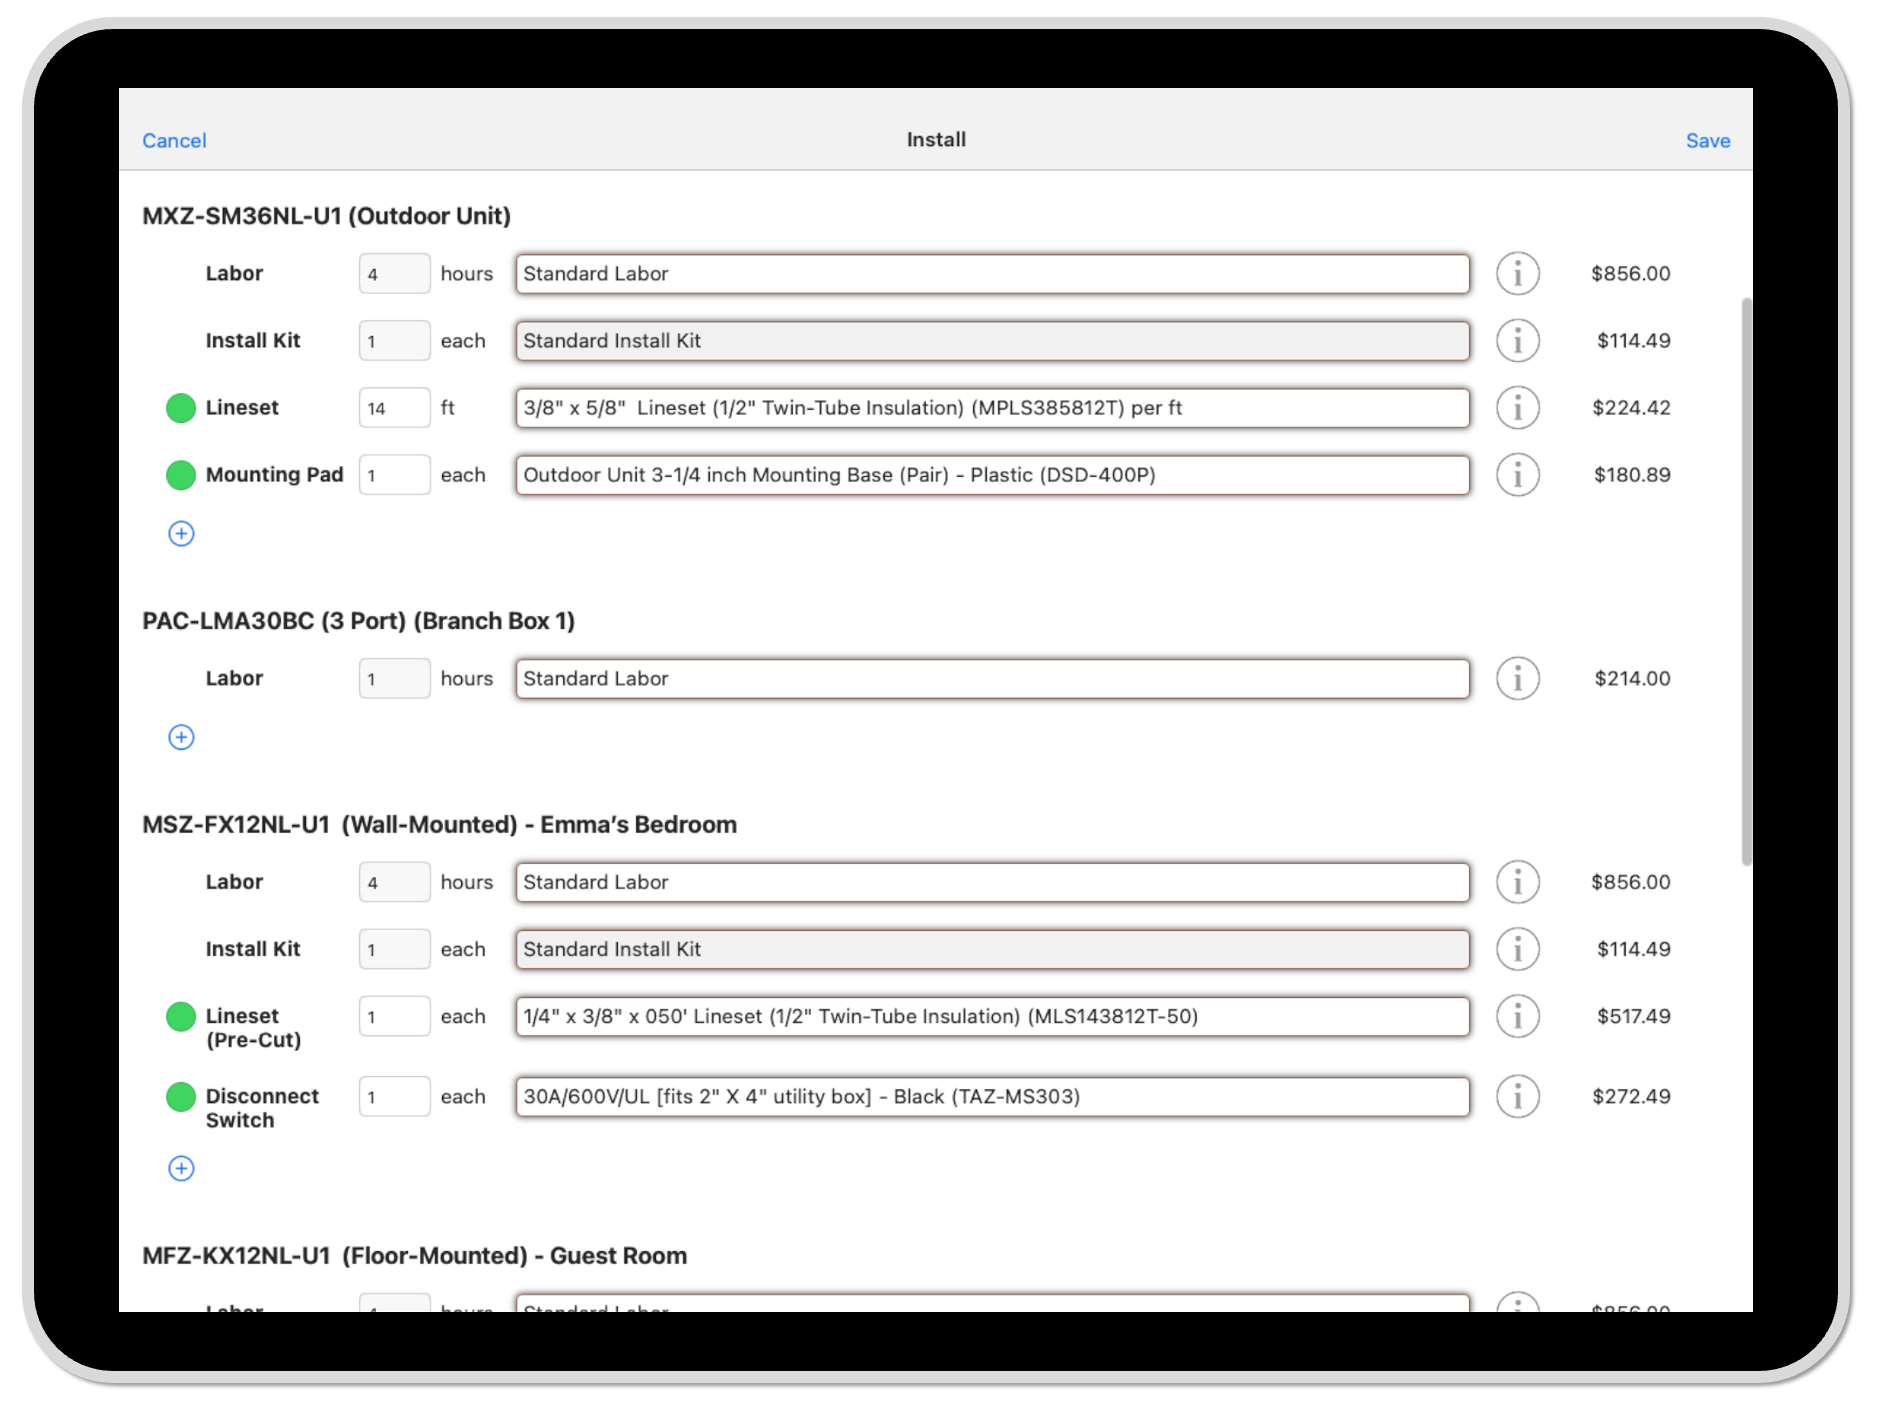
Touch Install
The app lists the required, recommended, and optional items for the proposed installation: labor, installation kits, line sets sized to port, pads, disconnects, line-hide, condensate pumps where the site calls for them. The consultant reviews and adjusts under company policy. This is the bill of materials the crew will work from.
Step 6 of 6
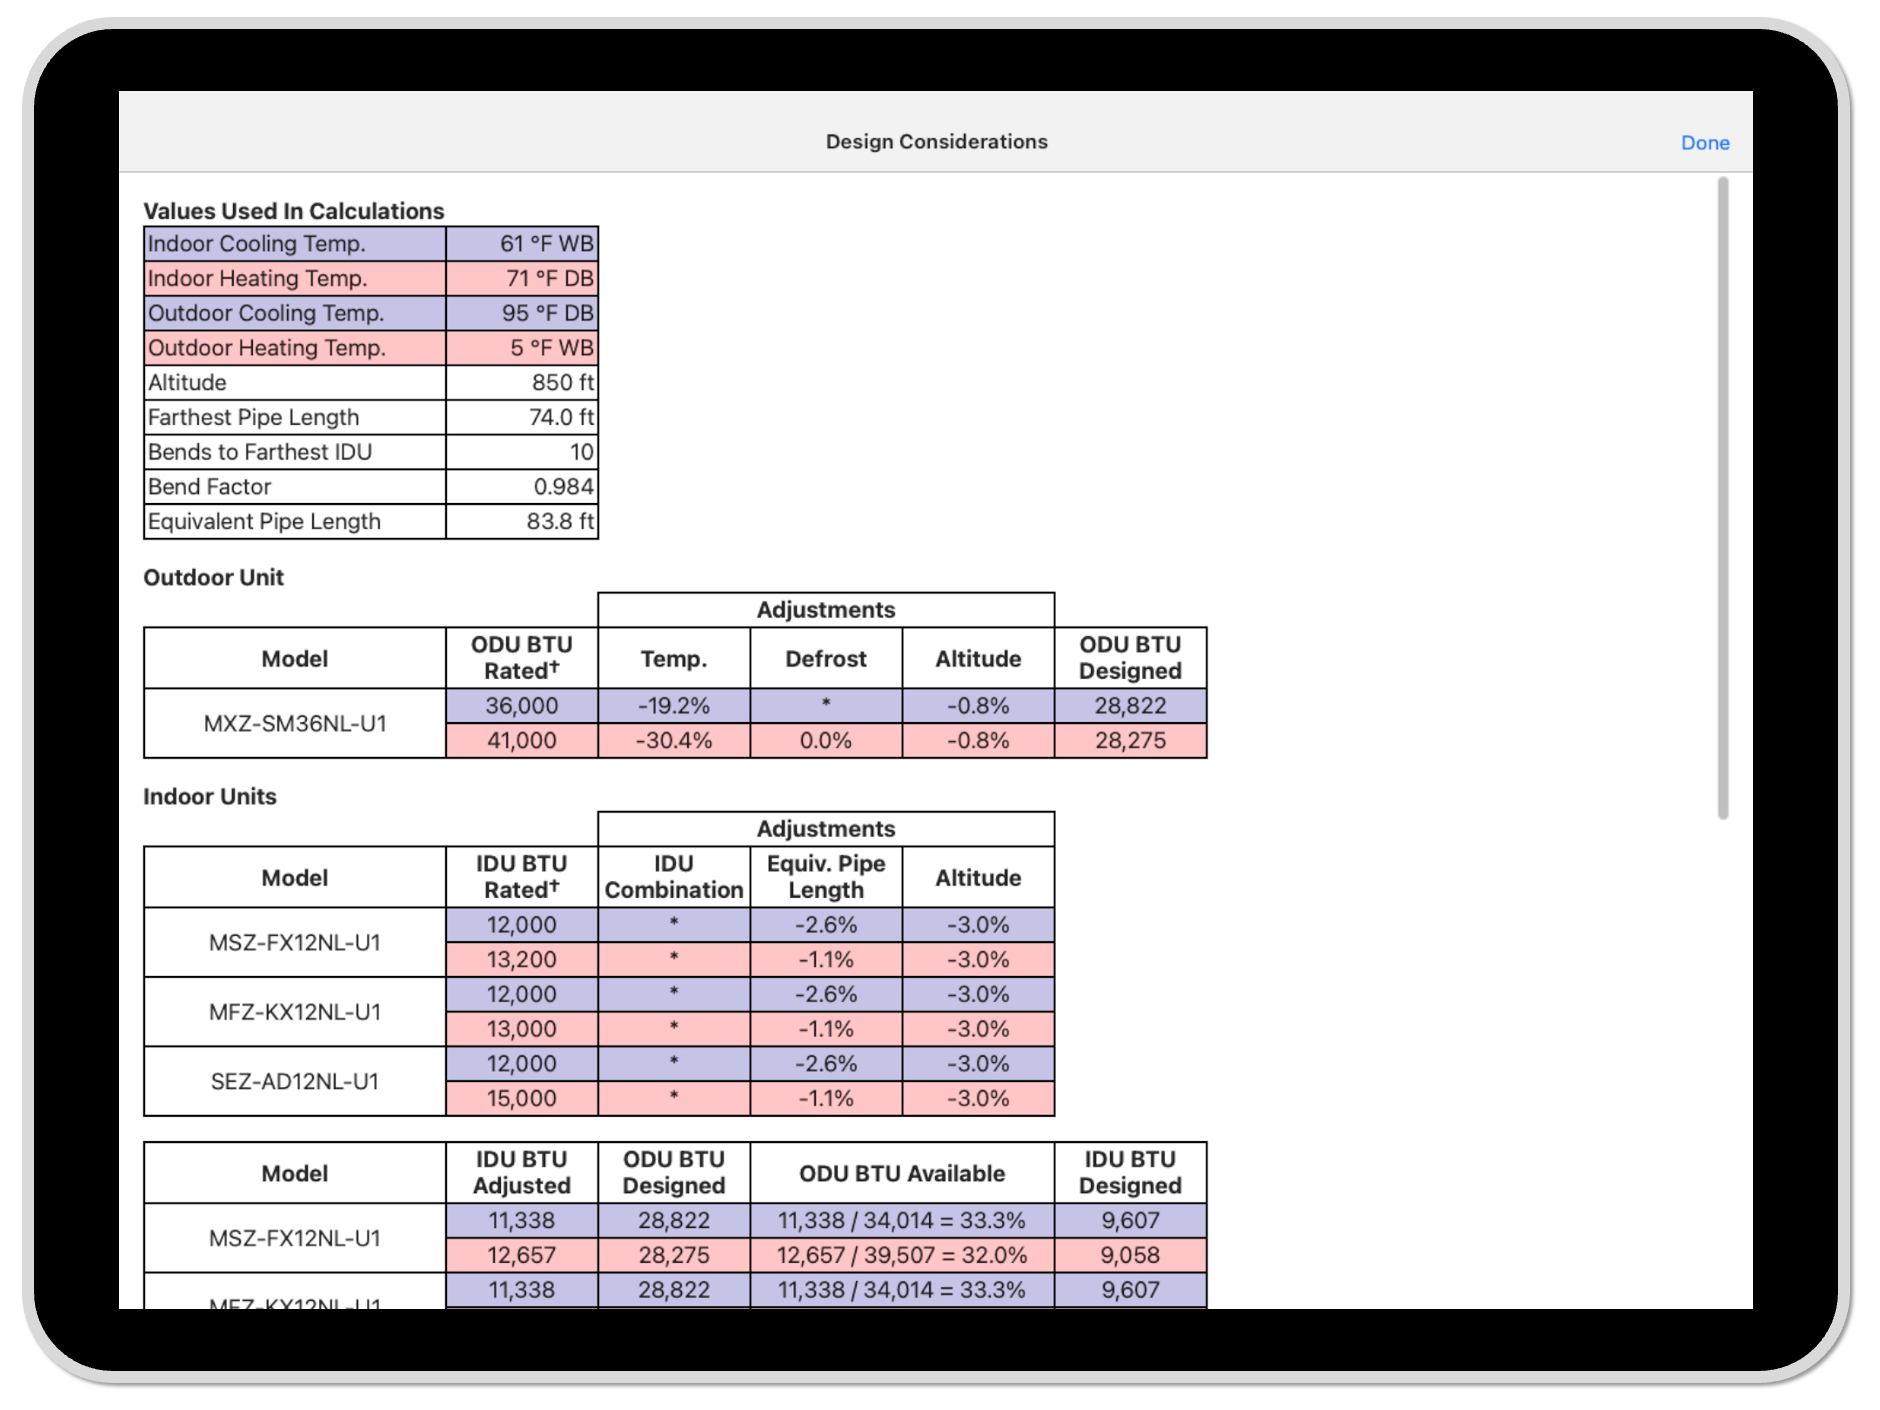
Touch Review
Show your work. The screen displays the design inputs and every adjustment applied: 95° cooling and 5° heating design temperatures, 850 feet of altitude, 74 feet of pipe with ten bends becoming 83.8 equivalent feet, and the designed capacities that survive the math. Homeowners rarely ask for this level of detail, but when one does, having it on the screen ends the conversation about whether the system is sized right.
What happens when something is wrong?
The app tells you before the crew finds out. In the example below, a preliminary layout entered a 100-foot equivalent run to a bonus room on a model with a configured limit of 82 equivalent feet. The guardrail flagged it at the kitchen table, and the consultant evaluated a different model and a different route before the proposal was final. On install day, that same discovery means a parts run, a change order, or a rollover.
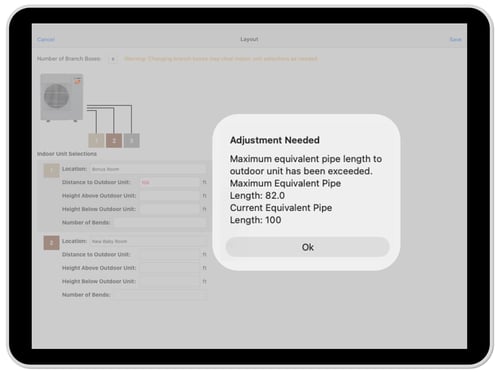
Guardrails like this one are checks against configured product data; they are not a substitute for technical know-how and skill. Consultants still need to identify logical unit placement locations, know how to manage condensate (e.g., pump or gravity drip), and when to recommend line hide and other factors.
Which ductless brands are supported?
Seven: Mitsubishi Electric Trane, LG, Fujitsu, Lennox Powered by Samsung, Carrier, Bryant, and Midea. You can quote any ductless brand in Sales Builder Pro; supported brands include the design tools, guardrails, and automation.
Many contractors offer Mitsubishi Electric Trane, the market leader, but also carry a second supported brand in their price book. A second brand broadens the price range they can offer, deepens the product line, and protects their schedule when one manufacturer's supply runs short. Because both brands run through the same design tools, the consultant learns one workflow, not two, and switches between brands without changing how the visit works.
What does the install crew get?
The comfort consultant becomes the install team's eyes on the job site. Two hand-offs do most of the work:
Hand-off 1 of 2
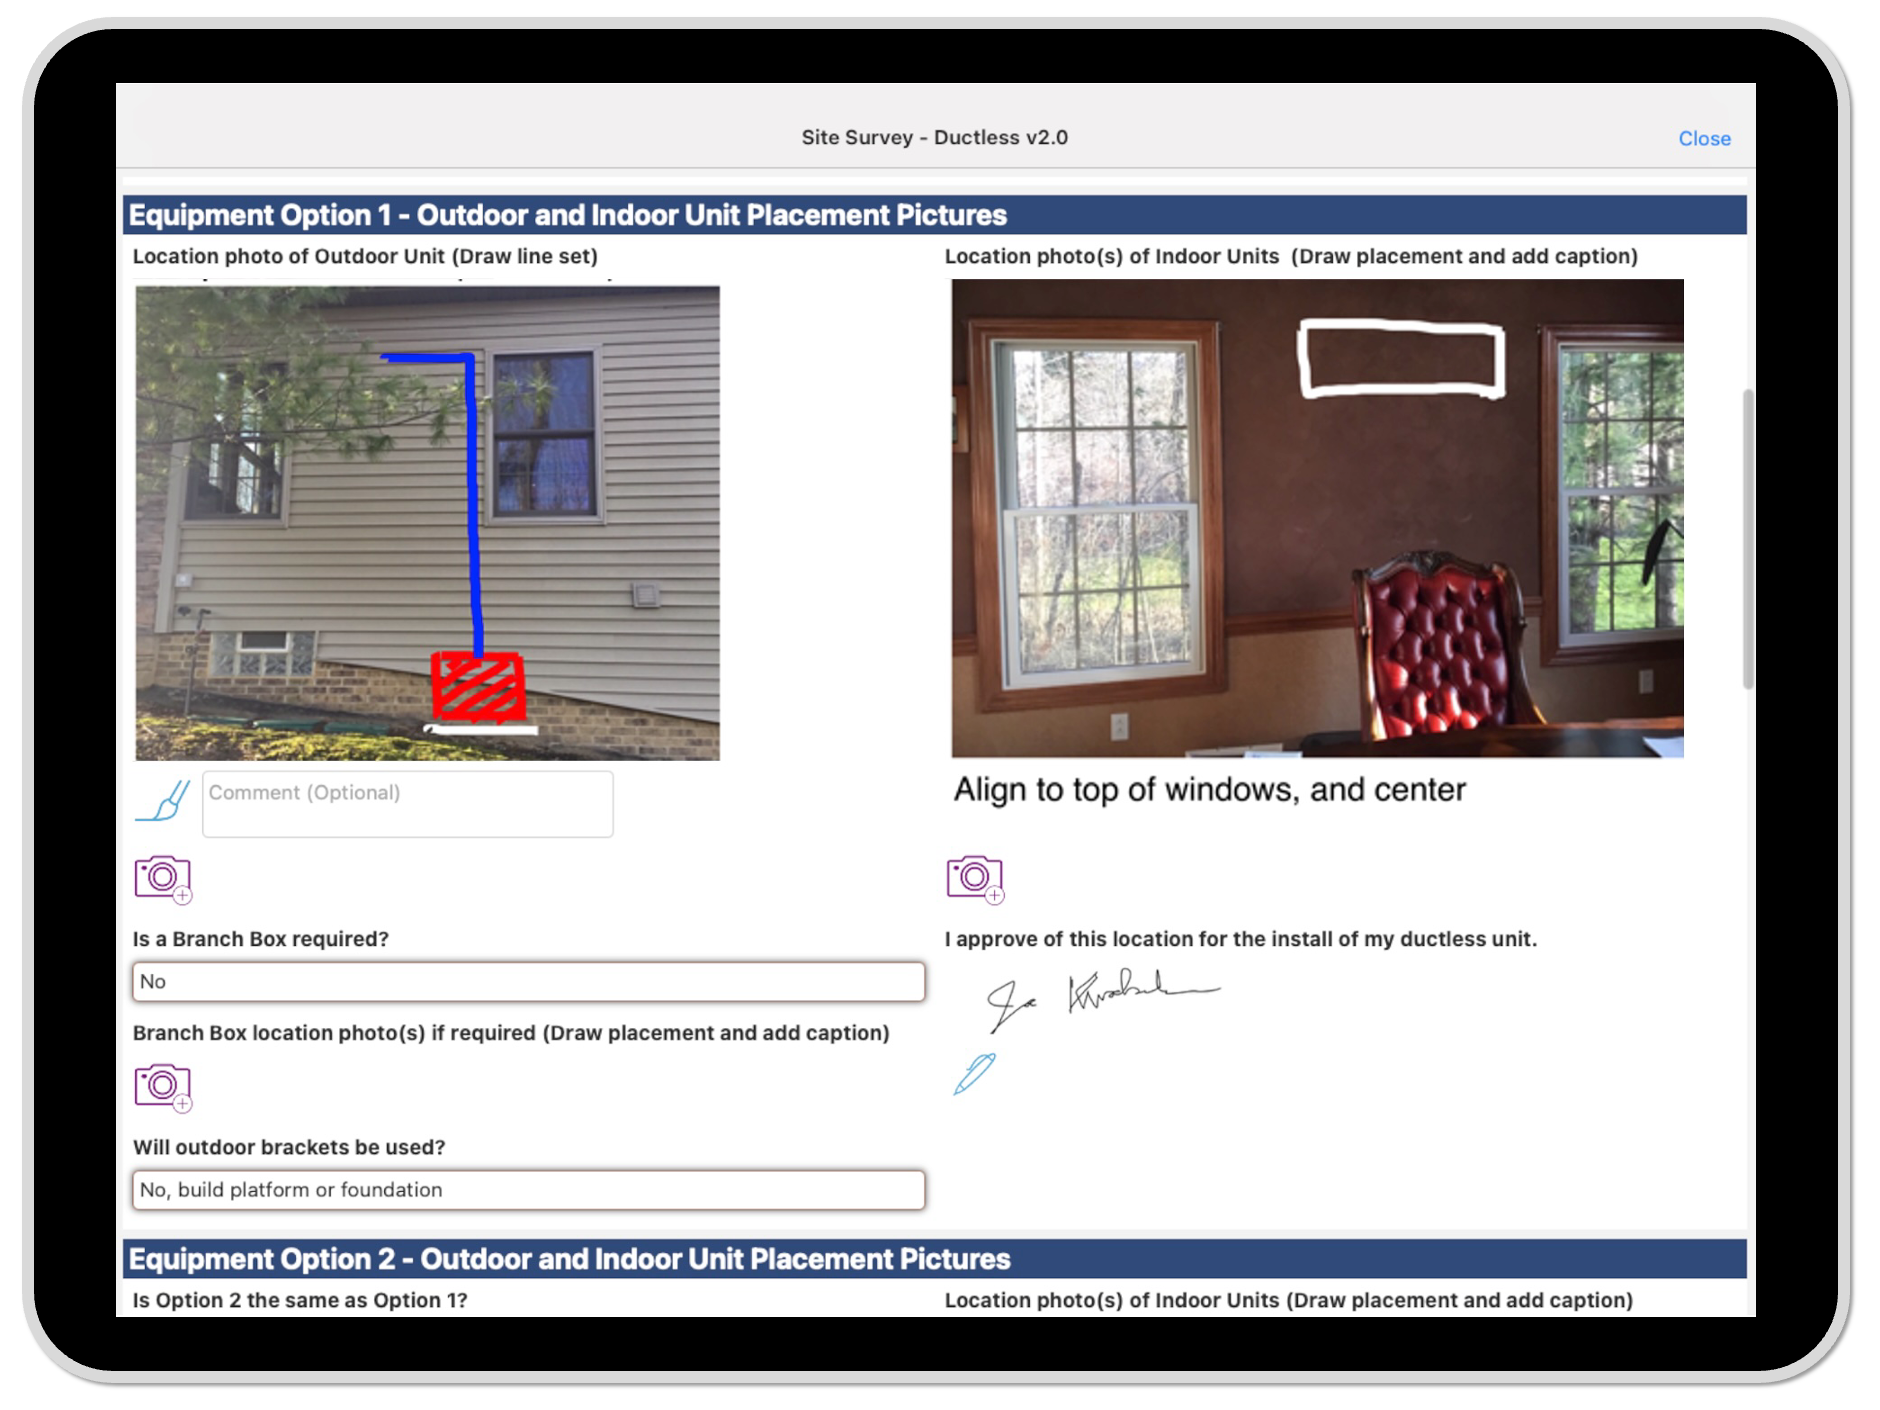
The Site Survey
Through the Site Survey, the install crew gets pictures and data from the job site. Sales Builder Pro also recommends the consultant get customer sign-off on indoor and outdoor unit placement. This literally and figuratively keeps everyone on the same page.
Hand-off 2 of 2
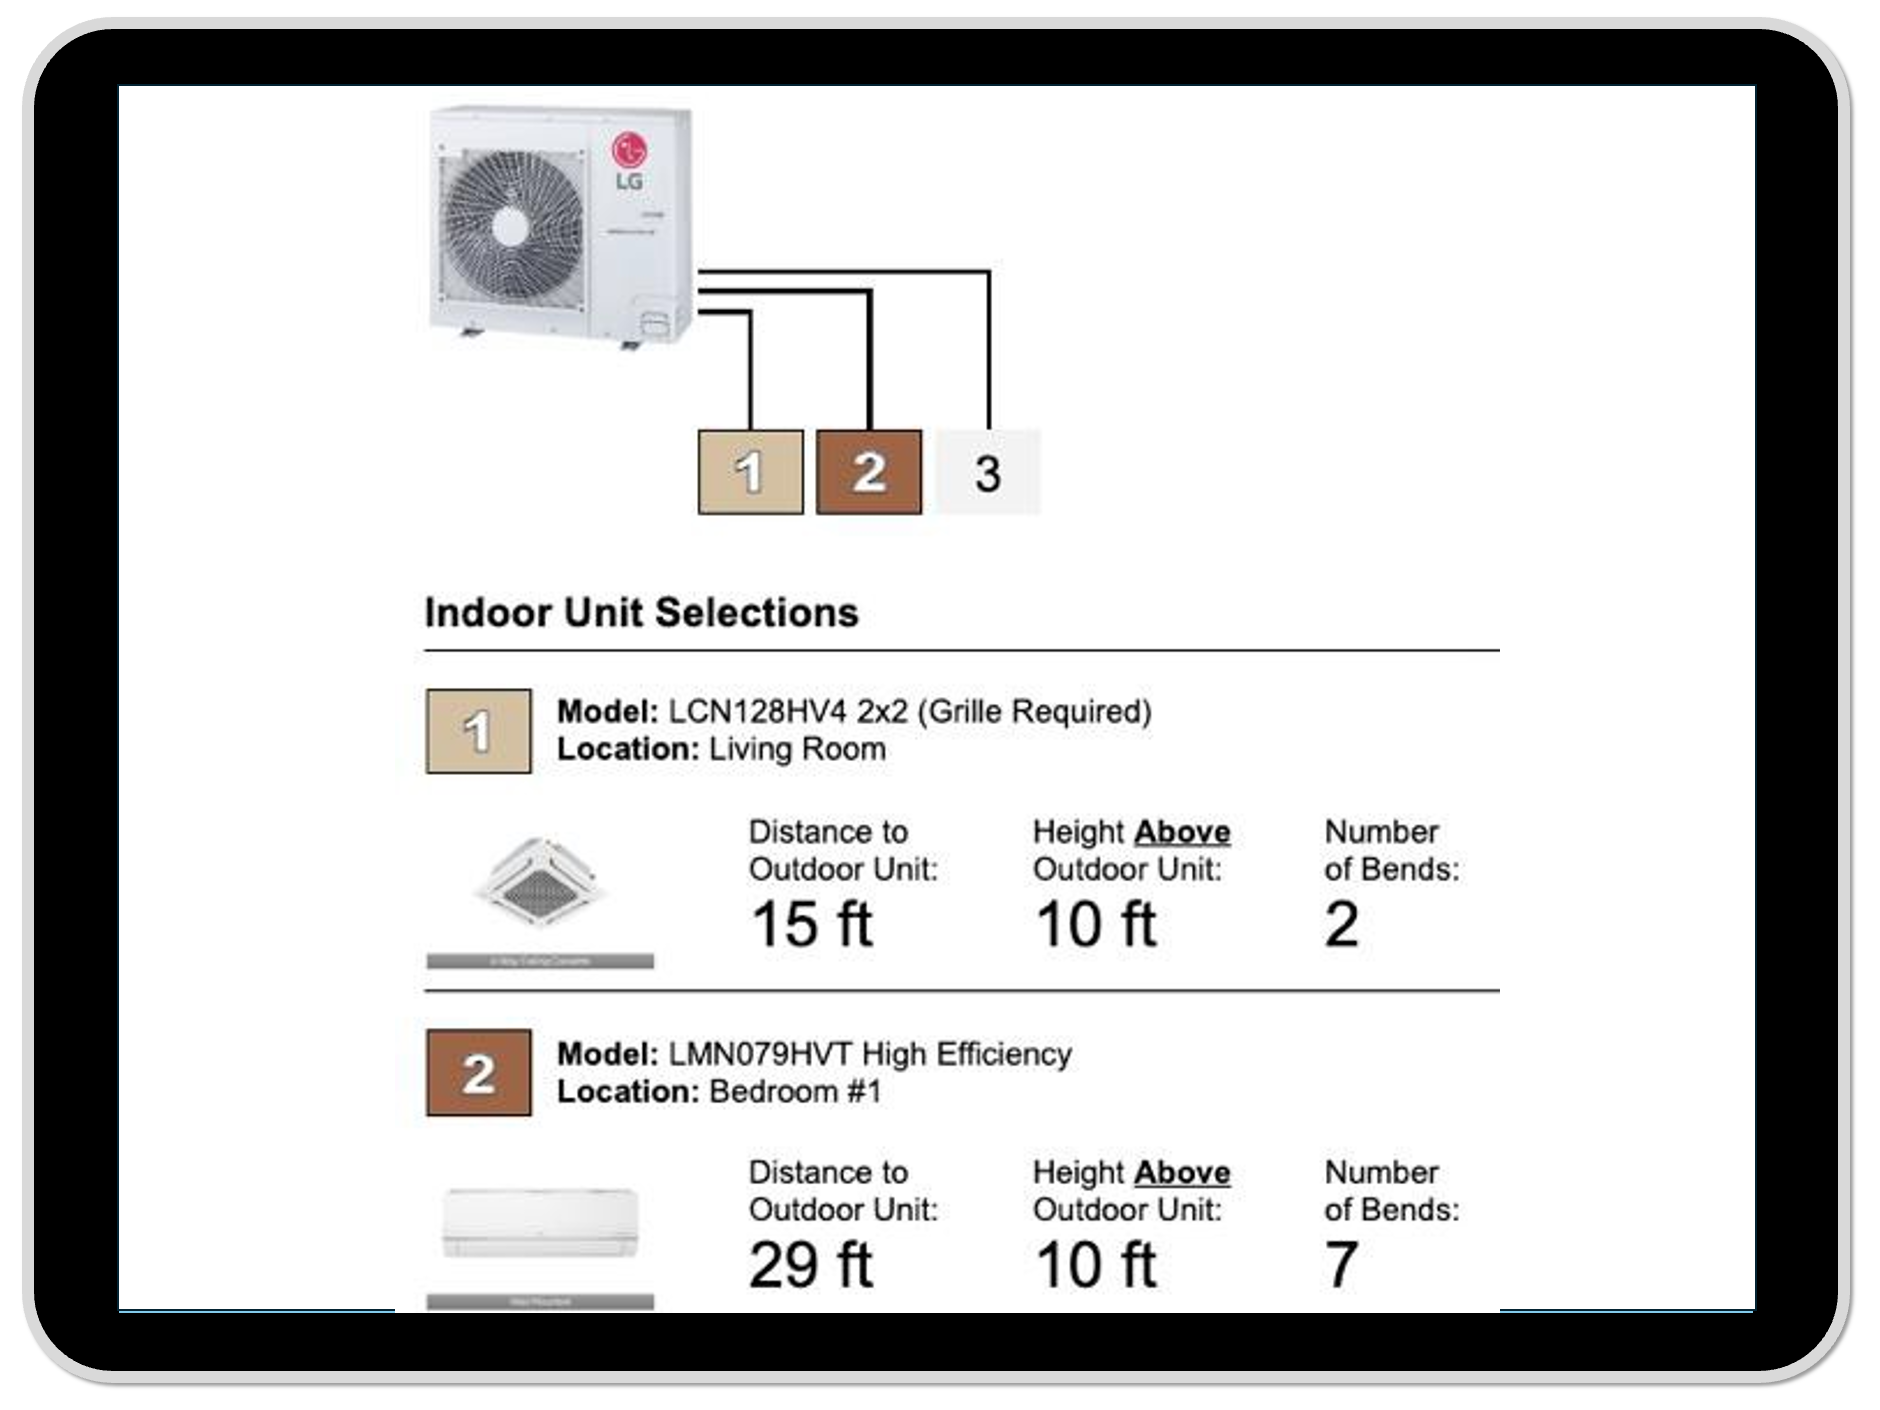
The install guide
The crew also gets the equipment detail, run lengths, accessories, and full bill of materials, on screen or by spreadsheet download. Most contractors print the install guide. The crew arrives with the right line sets and the right adapters, knowing where every unit goes. Fewer callbacks, fewer parts runs, fewer rollovers, and no argument about what was promised at the table.
What about the follow-up?
Here is the one rub. Even with a proposal on the table, ductless buyers think longer than replacement buyers, so follow-up takes longer. The eSign Toolkit turns that into a one-two punch. The daily Hot & Cold Report tells the consultant who to call: which proposals are being opened and compared, and which have gone quiet. Real-time notifications tell them when to call: the moment the homeowner opens the proposal again, usually at the kitchen table with the other decision-maker. Follow-up stops being a guess and becomes a short list with good timing. The eSign Toolkit overview covers how it works; pair it with financing shown beside the price, as described in HVAC Financing at the Kitchen Table, and a multi-room ductless job becomes a decision the family can make in one sitting or one phone call later.
What changes for the business?
Ask Glen Leppo. He spent 26 years with one HVAC contractor, ran Sales Builder Pro as its sales manager, and now serves as an area sales manager at Mitsubishi Electric Trane US, where he has watched two of his dealers adopt it. On his own team, "the amount of time I was spending creating proposals dropped by probably 80 percent. We immediately saw an increase in closure rate of 10 to 12 percent, and gross margin jumped almost 5 percent." Of the two dealers, one doubled its Mitsubishi Electric Trane sales, and the other quadrupled its ductless sales in a year. Of the first owner, he says, "It made his organization more profitable. He was ready to sell, and making them profitable actually shortened the time for him to be able to sell."
His explanation of why the one-visit quote matters is the whole argument in four sentences: "The homeowner's confidence in that contractor drops. You can do a great presentation, you've built up the anticipation, you've designed the system with them, and then they want to know. They want to know immediately. That's the most critical part." And his advice to contractors weighing the setup time, from a presentation he gave to a room of them: "The time you put into it, you will get back 100-fold."
That is what the gold mine looks like when a company decides to work it: consultants spend time on discovery and solutions instead of busywork, evenings go back to families instead of proposal templates, and the homeowner gets an answer while the problem is still on their mind.
How do you set it up?
Once per brand. Choose the supported brands you sell, load your price book, and enter your design criteria: the indoor and outdoor design temperatures for your market and your altitude. From then on, the tools run on every ductless proposal. Our sales playbook, The Residential HVAC Sales Process That Wins at the Kitchen Table, shows where the design step fits in the nine-step call.
What should you do this week?
Pull last month's ductless quotes and count how many needed a second visit before the homeowner saw a price. That number is the cost of designing somewhere other than the table. Then ask your consultants which rooms homeowners complain about most. Those rooms are the quarter-inch holes; the design tools are how you drill them in one trip.

John W. Steidley
John is the Founder and CEO of Intelligent Mobile Support, the company behind Sales Builder Pro. A father of three, he gets his biggest kicks from helping and watching his kids, employees, and contractors grow.